Difference between revisions of "Instances"
m (→Entering the instance: link to Battle Hall) |
m (→Specific information: link to Burned Maps) |
||
| (3 intermediate revisions by the same user not shown) | |||
| Line 44: | Line 44: | ||
=== Swamp instance 60-80 a/d, 180 hours === | === Swamp instance 60-80 a/d, 180 hours === | ||
| + | [[File:Swamp Instance.jpg|thumb|200px|right|Swamp Instance (from [https://elmaps.burningdownthe.net/ Burned Maps])]] | ||
* Also known as ''n00b'' instance. | * Also known as ''n00b'' instance. | ||
* Waves are: | * Waves are: | ||
| Line 52: | Line 53: | ||
** [[File:Dilimac 25px.png]] 2 [[Dilimac]] | ** [[File:Dilimac 25px.png]] 2 [[Dilimac]] | ||
* Guide: [[Beating the noob instance]] | * Guide: [[Beating the noob instance]] | ||
| − | |||
* Short name: 60+ | * Short name: 60+ | ||
* Time: 180 minutes | * Time: 180 minutes | ||
=== Mountain instance 80-100 a/d, 160 hours === | === Mountain instance 80-100 a/d, 160 hours === | ||
| + | [[File:Mountain Instance.jpg|thumb|200px|right|Mountain Instance (from [https://elmaps.burningdownthe.net/ Burned Maps])]] | ||
* Also known as ''advanced'' instance. | * Also known as ''advanced'' instance. | ||
* Waves are: | * Waves are: | ||
| Line 65: | Line 66: | ||
** [[File:Labagiu 25px.png]] 2 [[Labagiu]] | ** [[File:Labagiu 25px.png]] 2 [[Labagiu]] | ||
* Guide: [http://www.eternal-lands.com/forum/index.php?showtopic=55236 A Guide to the advance Instance] | * Guide: [http://www.eternal-lands.com/forum/index.php?showtopic=55236 A Guide to the advance Instance] | ||
| − | |||
* Short name: 80+ | * Short name: 80+ | ||
* Time: 180 minutes | * Time: 180 minutes | ||
=== Second Swamp instance 100-120 a/d, 180 hours === | === Second Swamp instance 100-120 a/d, 180 hours === | ||
| + | [[File:Swamp Instance.jpg|thumb|200px|right|Swamp Instance (from [https://elmaps.burningdownthe.net/ Burned Maps])]] | ||
* Also known as the ''almost pr0'' instance. | * Also known as the ''almost pr0'' instance. | ||
* Waves are: | * Waves are: | ||
| Line 77: | Line 78: | ||
** [[File:Red Dragon 25px.png]] 1 [[Red Dragon]] | ** [[File:Red Dragon 25px.png]] 1 [[Red Dragon]] | ||
** [[File:Cocaral 25px.png]] 2 [[Cocalar]] | ** [[File:Cocaral 25px.png]] 2 [[Cocalar]] | ||
| − | |||
* Short name: 100+ | * Short name: 100+ | ||
* Time: 180 minutes | * Time: 180 minutes | ||
=== Second Mountain instance 120-140 a/d, 160 hours === | === Second Mountain instance 120-140 a/d, 160 hours === | ||
| − | * Also known as ''Instance for pr0s that want to farm'' instance | + | [[File:Mountain Instance.jpg|thumb|200px|right|Mountain Instance (from [https://elmaps.burningdownthe.net/ Burned Maps])]] |
| + | * Also known as ''Instance for pr0s that want to farm'' instance, short name, ''pr0 farm instance'' | ||
* Waves are: | * Waves are: | ||
** [[File:Yeti 25px.png]] 150 [[Yeti]] or [[File:Arctic Chimeran 25px.png]] 110 [[Arctic Chimeran]] | ** [[File:Yeti 25px.png]] 150 [[Yeti]] or [[File:Arctic Chimeran 25px.png]] 110 [[Arctic Chimeran]] | ||
| Line 89: | Line 90: | ||
** [[File:Mare_Bulangiu_25px.png]] 1 [[Mare Bulangiu]] or [[File:Bulangiu 25px.png]] 1 [[Bulangiu]] | ** [[File:Mare_Bulangiu_25px.png]] 1 [[Mare Bulangiu]] or [[File:Bulangiu 25px.png]] 1 [[Bulangiu]] | ||
** [[File:Cocaral 25px.png]] 2 [[Cocalar]] | ** [[File:Cocaral 25px.png]] 2 [[Cocalar]] | ||
| − | |||
* Short name: 120+ | * Short name: 120+ | ||
* Time: 180 minutes | * Time: 180 minutes | ||
=== Ice instance 120+ a/d, 150 hours === | === Ice instance 120+ a/d, 150 hours === | ||
| + | [[File:Ice Instance.jpg|thumb|200px|right|Ice Instance (from [https://elmaps.burningdownthe.net/ Burned Maps])]] | ||
* Also known as the ''pr0'' instance. | * Also known as the ''pr0'' instance. | ||
* Waves are: | * Waves are: | ||
| Line 101: | Line 102: | ||
** [[File:Bulangiu 25px.png]] 1 [[MuieLaFermieri]] | ** [[File:Bulangiu 25px.png]] 1 [[MuieLaFermieri]] | ||
** [[File:Bulangiu 25px.png]] 2 [[Mare Bulangiu]] or 2 [[Bulangiu]] | ** [[File:Bulangiu 25px.png]] 2 [[Mare Bulangiu]] or 2 [[Bulangiu]] | ||
| − | |||
* Short name: 120++ | * Short name: 120++ | ||
* Time: 240 minutes | * Time: 240 minutes | ||
=== Dungeon instance 110+ a/d, 96 hours === | === Dungeon instance 110+ a/d, 96 hours === | ||
| + | [[File:Dungeon Instance.jpg|thumb|200px|right|Dungeon Instance (from [https://elmaps.burningdownthe.net/ Burned Maps])]] | ||
* Can be entered from 110 a/d and above | * Can be entered from 110 a/d and above | ||
* Also known as the ''WTF??111?!'' instance because this is the hardest one. | * Also known as the ''WTF??111?!'' instance because this is the hardest one. | ||
| Line 116: | Line 117: | ||
** [[File:Nasparliu 25px.png]] 130 [[Nasparliu]] or [[File:Giant 25px.png]] 80 [[Nasty giant]] | ** [[File:Nasparliu 25px.png]] 130 [[Nasparliu]] or [[File:Giant 25px.png]] 80 [[Nasty giant]] | ||
** [[File:Castellan 25px.png]] 1 [[Castellan]] | ** [[File:Castellan 25px.png]] 1 [[Castellan]] | ||
| − | |||
* Time: 240 minutes | * Time: 240 minutes | ||
Latest revision as of 09:51, 3 October 2018
The information on this page is compiled from the thread on the Eternal Lands Forum.
General information
This will probably be common for all instances:
Preparation
There is a dedicated subforum for instances NOT used very often where you can get and post valuable info, organize teams or post your pics. This wiki also has a section devoted to guides about instances.
Entering the instance
- Go to Morcraven Marsh Battle Hall. There, you will find Ilie.
- Before talking to Ilie, talk with the other players to decide which players will enter as a group. The group must stand or sit close to Ilie.
- Once the group is together, all members of the group must join a common channel and then click on the channel's tab to set it as the active channel. The channel number must be higher than 1000.
- After all members of the group have joined a common channel, one player can talk to the NPC and choose to enter an instance. Then, everyone from that group will go. Groups are determined by channel number, so every member must set the group channel as the active channel.
- You can ONLY enter an instance if your average of attack and defense is within the designated range. The exact formula is (a+d)/2, if result is a fraction, truncated to next lowest integer. Example: if you have att 79 and def 82, the result is 80.5, which would enable you to visit both the swamp (60-80) and the mountain (80-100) instance. Drinking potions to increase your att/def can help you to get into the next higher league, however, drinking att or def REDUCTION pots won't achieve anything.
Inside the instance
- There is a time limit to complete each instance.
- If you die with a Rostogol Stone, you will respawn at the beginning of the instance.
- If you die without a Rostogol Stone, there is no way to re-enter the instance.
- There are no storages inside an instance.
- There are 5 waves of monsters, each one spawning shortly after the current wave monsters are killed.
- The
#iicommand will display instance information - If you log off while inside an instance, you will appear inside in the instance when you log in again, unless the instance ended.
- If the number of players goes lower than 3 inside the instance map (for any cause), the instance will end.
Leaving the instance
- The instance ends if the instance is completed, or if the time limit of 200 minutes to finish is over. The instance will be canceled and participants teled out if the number of players in the map falls below 3 ppl.
- Each map has an exit in the shape of a cave entrance.
- Dying without a Rostogol Stone will make you leave the instance.
- WARNING: On no-rosto days you will drop your stuff and go to the underworld if you die in an instance. However, the rosto won't disapppear.
- You can only enter an instance once every 150 (ice), 160 (mountain), 180 (swamp) hours, or 96 (dungeon) hours. Type
#iito see how long it has been since you last entered an Instance. - You can reduce the waiting time for the ice, mountain, and swamp instances you have remaining by giving Ilie one of the following:
 1 Red Dragon Scale - 30 hours
 1 Blue Dragon Scale - 50 hours
 1 Invasion Token - 200 hours
- Note: multiple scales can be used to remove all of your waiting time.
Specific information
Swamp instance 60-80 a/d, 180 hours
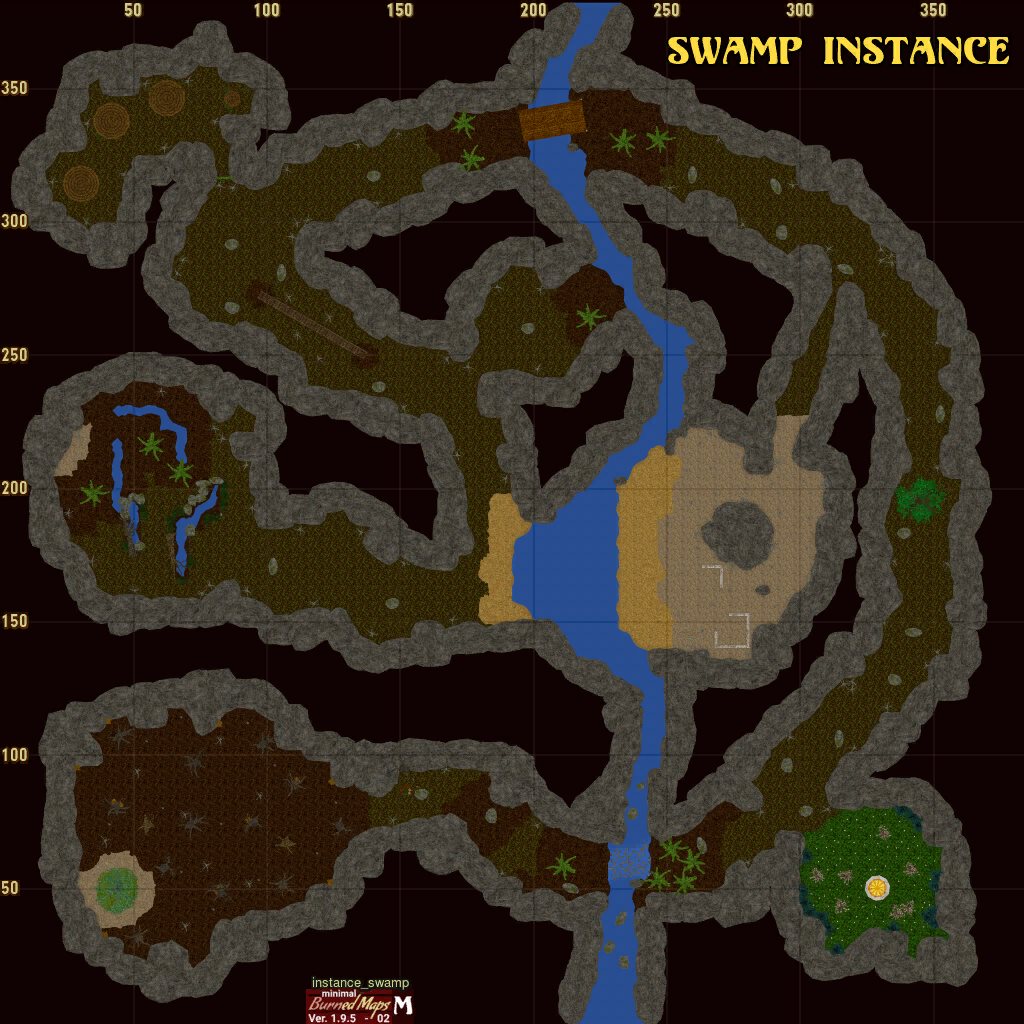
- Also known as n00b instance.
- Waves are:
- Guide: Beating the noob instance
- Short name: 60+
- Time: 180 minutes
Mountain instance 80-100 a/d, 160 hours
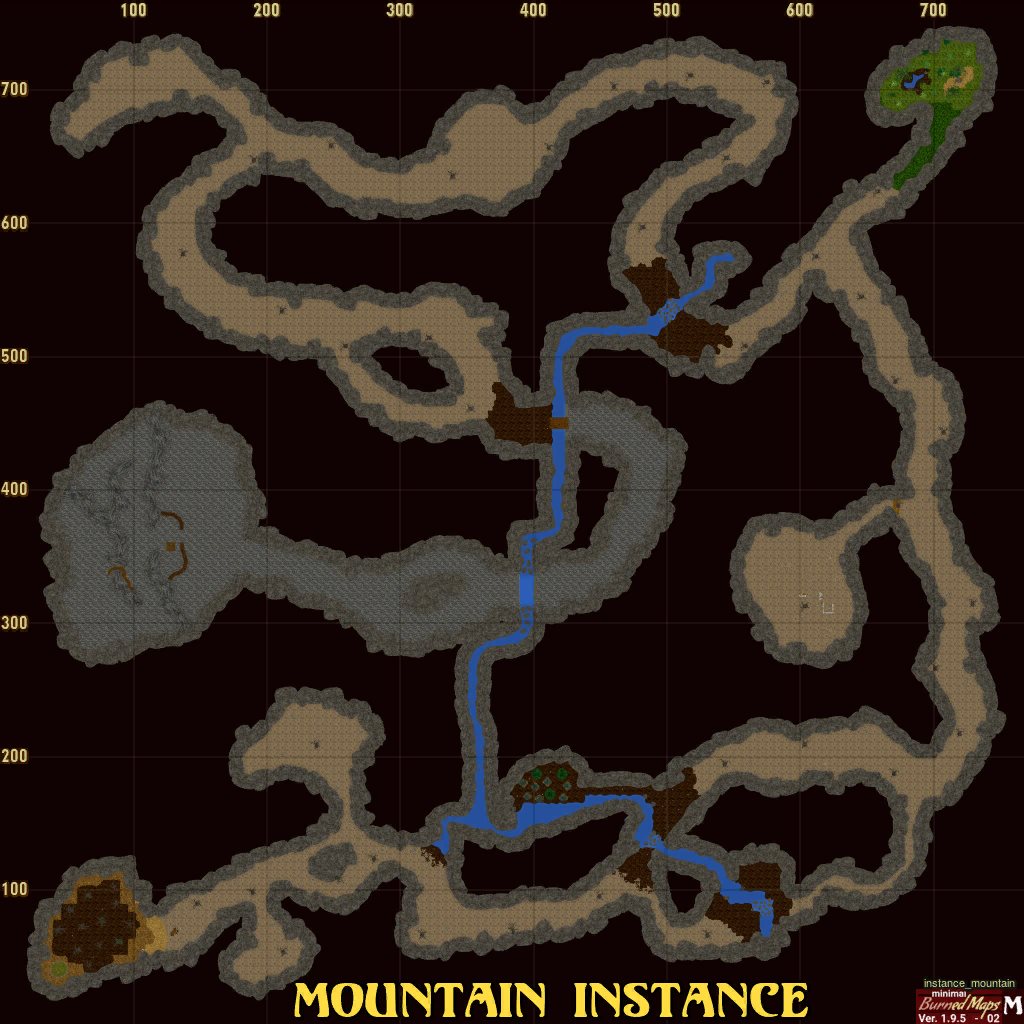
- Also known as advanced instance.
- Waves are:
- Guide: A Guide to the advance Instance
- Short name: 80+
- Time: 180 minutes
Second Swamp instance 100-120 a/d, 180 hours

- Also known as the almost pr0 instance.
- Waves are:
 37 Arctic Chimeran or
  27 Cockatrice
 22 Nasparliu or
  16 Giant
 2 Jegos or
  30 Legionnaire Orc
 1 Red Dragon
 2 Cocalar
- Short name: 100+
- Time: 180 minutes
Second Mountain instance 120-140 a/d, 160 hours

- Also known as Instance for pr0s that want to farm instance, short name, pr0 farm instance
- Waves are:
 150 Yeti or
  110 Arctic Chimeran
 55 Nasty giant or
  85 Nasparliu
 4 Ice Dragon or
  5 Black Dragon
 1 Mare Bulangiu or
  1 Bulangiu
 2 Cocalar
- Short name: 120+
- Time: 180 minutes
Ice instance 120+ a/d, 150 hours
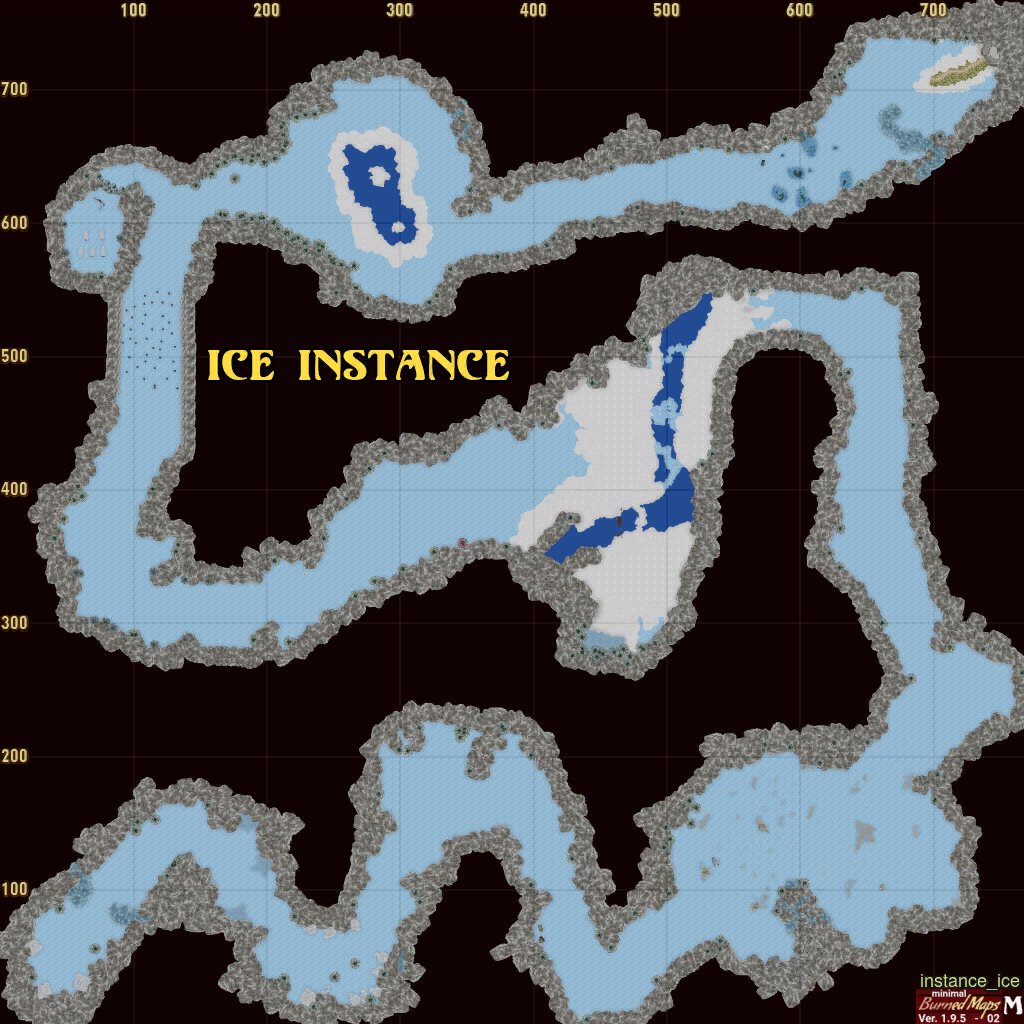
- Also known as the pr0 instance.
- Waves are:
 45 Giant or
  80 Arctic Chimeran or
  25 Little Dragon Blue
 90 Nasparliu
 4 Blue Dragon or
  6 Ice Dragon or
  10 Black Dragon
 1 MuieLaFermieri
 2 Mare Bulangiu or 2 Bulangiu
- Short name: 120++
- Time: 240 minutes
Dungeon instance 110+ a/d, 96 hours

- Can be entered from 110 a/d and above
- Also known as the WTF??111?! instance because this is the hardest one.
- Requires 8 people to enter.
- 96 hour wait time is mandatory. Waiting time cannot be removed with scales, etc.
- Waves are:
 10 Ice Dragon or
  6 Blue Dragon
 1-2 Mare Bulangiu
 1 MuieLaFermieri
 130 Nasparliu or
  80 Nasty giant
 1 Castellan
- Time: 240 minutes
Notes
- Apparently the drops are good, with a 50% chance to get either a nexus or day stone. (In the Dungeon Instance). The First Mountain Instance & The Dungeon Instance are widely the most profitable. The Second Swamp Instance, Ice Instance and Second Mountain Instance profitability can vary quite dramatically with Instance Updates. The First Swamp Instance is almost always a break even or meager profit, with losses being fairly common.
- There are some special instance-only creatures
- Ranging is very useful inside the instances, and a requirement for some later ones, such as the Dungeon Instance.
The logic behind sharing
We first need to recognize what items can to be shared and which proportions are calculated individually for the players. It is clear that the gained gold coins and values for items must be summed.
Subsequently, gold coins which players have spend, must first of all be subtracted in total. The result is divided by the number of eligible players.
The individual expenses are added to the outcome of this calculation. The number of gold coins from this calculation is again reduced by gold coins which is given in form of an item to the player respectively.
It is important to understand that the recources brought inside are directly and fully paid and thus at the end of the instance, the remaining recources belong to the group and no longer to the individual. Hence they can be shared among the players.
For a correct calculation the sequence of steps must be followed. Happy sharing : )
The Formula
There are some sophisticated instance share calculators. The basic formula can be written like this:
<br\>
